Dlink WiFi Extender Setup
The Dlink WiFi extender setup process is being executed by various users who are in desperate need of accessing a blazing-fast internet connection to complete their online tasks without dropping WiFi. In case you are one of them, then this page has covered all the steps through which the configuration process can be executed.
This page has been divided into two parts. The first section talks about how setup can be taken forward using the WPS or WiFi-Protected Setup method and the second segment has discussed the steps to do the same using the manual or the web user interface method. After reading both methods, it is up to you which one you want to implement.
Dlink WiFi Extender Setup [WPS or Push Button Method]
Every setup method has a basic requirement that needs to be fulfilled. If left unattended, coming across technical issues will be your fate. To avoid this from happening, you need to know what the requirement of this method is.
In this method, the D-Link wireless range extender as well as the host router should have a WPS button located on them. In case the WPS button is not located on the router, using this method for Dlink WiFi extender setup will become next to impossible for you.
Here are the steps that you should read to set up your device using the WPS method:
- Locate a wall socket, a non-damaged and non-short-circuited one to be precise.
- Once found, plug your D-Link extender into it and press the power button on it.
- Let the power LED light become solid as well as stable.
- Now, time to look for the WPS button on the extender.
- When you find it, press it and hold on for some time.
- After about 2 MINUTES, press the same button on the host router.
- You need to hold on again.
As soon as the WPS LED lights on both devices have become solid, you need to change the location of the D-Link wireless range extender. Ensure that you are placing it in a location that serves as a midway between the router and the dead zone in your house.
Setup D-Link Extender [Manual or Web User Interface Method]
Remember how we talked about the basic requirements in every setup method? This method has one too, i.e. you should have access to an updated internet browser. Apart from this, it should be clean from cache, cookies, and browsing history.
The reason why your browser needs to be updated is because there is a need to access the web user interface in this method, and this is not possible with an outdated browser. Thus, ensure that your browser is up-to-date.
Read these steps to use the D-Link extender login password to set up the extender:
- Like you found a socket to plug the extender in the last method, do the same here.
- Switch on your computer and open the wireless utility.
- Select the network name or SSID of your D-Link wireless range extender.
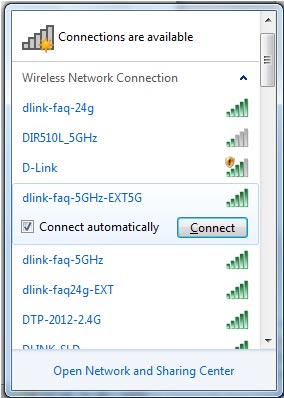
- Enter the WIFI PASSWORD and hit Connect.
- You will find the SSID and password on the included WIFI CONFIGURATION CARD.
- Load a browser on your PC and enter the default web address of the extender.
- The default web address is dlinkap.local.
- Although the web address will work, in case it does not, use 192.168.0.50.
- 192.168.0.50 is the DEFAULT IP ADDRESS used for Dlink WiFi extender setup.
- When asked to enter the ADMIN PASSWORD, leave the field BLANK.
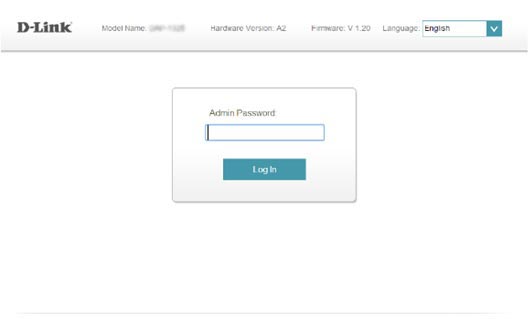
- Once done, click the LOGIN button and wait for the next window to appear.
- Click SETUP WIZARD.
- Hit NEXT.
- You will get redirected to the SELECT CONFIGURATION METHOD screen.
- Click on IF YOU WANT TO SETUP YOUR NETWORK MANUALLY.
- Select the NEXT button and select the network you wish to use.
- Enter the password for your uplink network.
- In order to continue, hit NEXT.
- Soon the extender will re-broadcast the WiFi connection from the router.
- Also, the SSID and password will be generated for both radio bands.
- Hit NEXT and wait for the setup process to get completed.

After the Dlink WiFi extender setup process finishes, you may connect your client devices to the network of the extender and enjoy a blazing-fast and seamless internet connection, just what you wanted when you landed on this page.