How to Complete DLink DAP-1955 Extender Setup?
If you are finding it difficult to complete DLink DAP-1955 extender setup, the information given below will help you a lot. Here, we have discussed not 1 or 2 but 3 different methods that can be used to complete the setup process. These methods are mentioned below:
- D-Link WiFi App
- Quick WPS method
- Manual method
You will need a working internet connection and an already configured router to set up your DAP-1955 extender. Apart from this, two working wall sockets at a distance of 8-10 ft are necessary. You need to plug your extender and router into these sockets only.
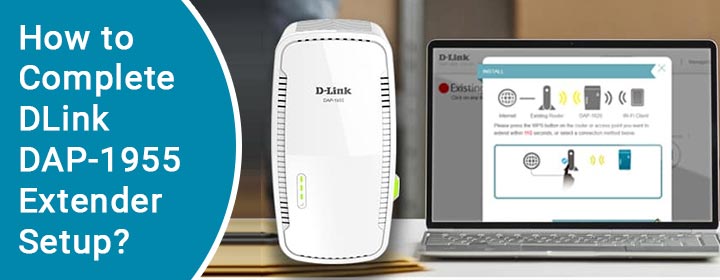
DLink DAP-1955 Extender Setup Using D-Link WiFi App
The very first method to complete DLink extender setup for DAP-1955 extender is via the app. You need to install the D-Link WiFi app on your mobile phone to complete the setup process:
- Plug your DAP-1955 into a wall socket present in 8-10 ft of your main router.
- Thereafter, switch on the main router and then the range extender.
- Launch the D-Link WiFi app on your mobile phone.
- Tap the “Install New Device” option.
- Now, pick the Quick Installation Card and find the QR code.
- Scan the QR code via the D-Link WiFi app and follow the on-screen instructions.
DLink DAP-1955 Extender Setup Using WPS Method
The WPS method to set up the D-Link WiFi extender DAP-1955 will come to your help if you have lost the Installation card or are unable to understand the app instructions. But, the condition for this method is that your host router must be WPS-authorized. The steps for D-Link DAP-1955 setup WPS method are given below:
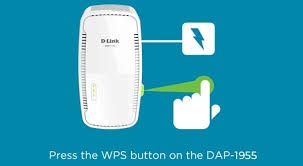
- Plug the range extender into an available power outlet near (8-10ft) wireless router.
- Ensure that the Power toggle switch of the extender is in ON position.
- Wait until the Status LED on the extender is blinking amber (this will take 3 minutes).
- Press the WPS button on your router for 3 seconds.
- The router’s LED will blink. If it doesn’t, hold the WPS button a little longer.
- Thereafter, within one minute, press the WPS button on your DAP-1955 for 2-3 seconds.
- The Status LED will start blinking green.
- Your extender’s Status LED light might take 3 minutes to turn green.
- The setup is now complete!
DLink DAP-1955 Extender Setup via Manual Method
This method can be called the universal method to install the extender. You can use it if you can’t set up the extender using the app or the WPS method. In this method, you will have to go to dlinkap.local to complete the installation process. Read the steps given below to learn how:
- Plug your extender and main router in the same room. The distance between them should not be very much.
- After switching on the router and extender, connect computer to the extender.
- You can use an Ethernet cable or connect wirelessly via the WiFi Name/SSID and extender’s password.
- The SSID and WiFi password are mentioned on the DAP-1955 extender’s label.
- Launch the default web browser on the computer.
- Type the DAP-1955 default URL into the address bar and press Enter.
- You will see a login page where you have to enter the Admin Password.
- Leave the password field blank and click Log in.
- Agree to the Terms of using the extender and continue.
- You will be guided by the wizard now.
- Select Next to start.
- Wait and let your DAP-1955 scan for the available networks.
- If you are able to see the network of your router, select it. Otherwise, select Manual.
- If the network was visible, enter the WiFi password of your router and click Next.
- Just in case, you chose Manual, enter the SSID and WiFi password of the host router and select Next.
- Specify WiFi network settings.
- Enter and admin password to secure your extender’s web GUI and select Next.
- Choose Time Zone and update the firmware after that.
- The Final Settings page will appear.
- Click Finish to close the wizard.
- The changes will be saved and the extender will reboot.
The Conclusion
Now that you are aware of 3 methods of completing the D-Link DAP-1955 extender setup, we expect that after using any one, you will be able to install the extender. You can now connect your devices to the newly extended network of DAP-1955.